

Finding the Cuisinart Automatic Grind & Brew 12-Cup Coffee Maker manual is only the first step. Knowing how to set up the machine, choose the right grind and brew settings, clean the grinder, and troubleshoot common problems is what really helps you get consistently good coffee.
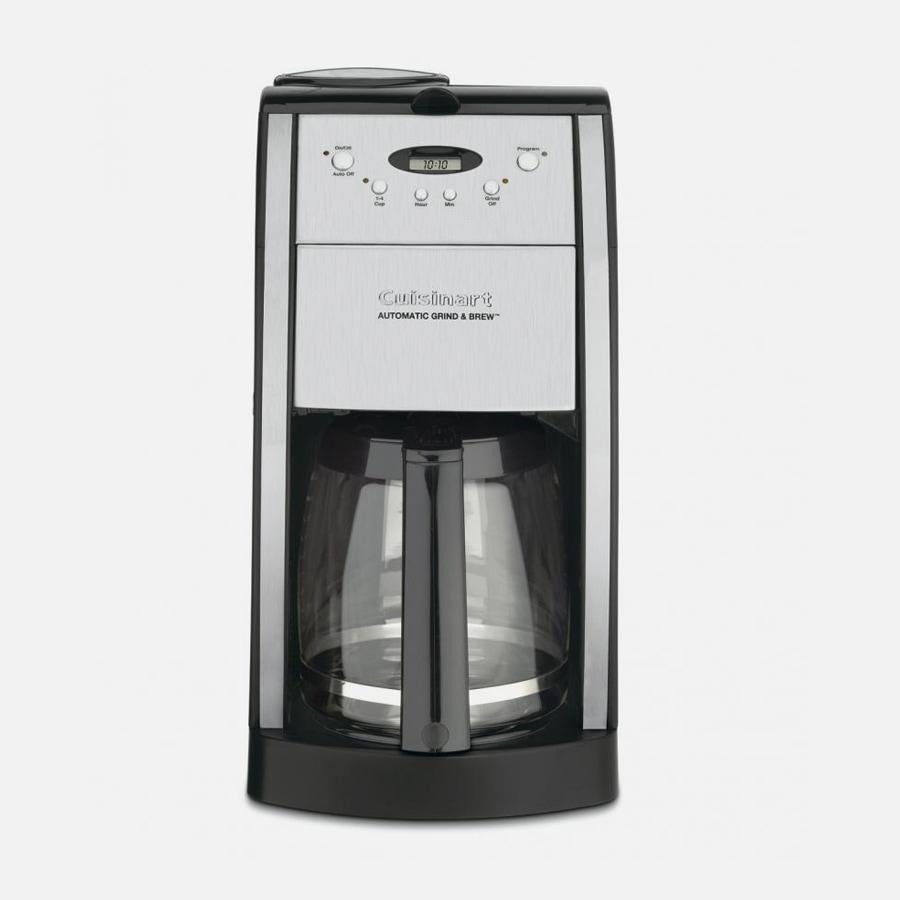
Cuisinart has produced several 12-cup Grind & Brew models, including the DGB-500, DGB-550, and DGB-800, and their controls and grinder designs are not identical. This guide explains the core operating principles while highlighting why you should always match instructions to your exact model. Cuisinart maintains a dedicated Coffee Maker Manuals & Product Help page where you can locate model-specific documentation.
Whether you’ve just bought one, inherited an older model, or misplaced the original instruction booklet, the sections below will help you understand the machine before you start brewing.
In This Article
What You Need to Know About the Cuisinart Automatic Grind & Brew 12-Cup Coffee Maker Manual
The biggest mistake people make with an automatic Grind & Brew machine is assuming every Cuisinart model works exactly the same way. They don’t.
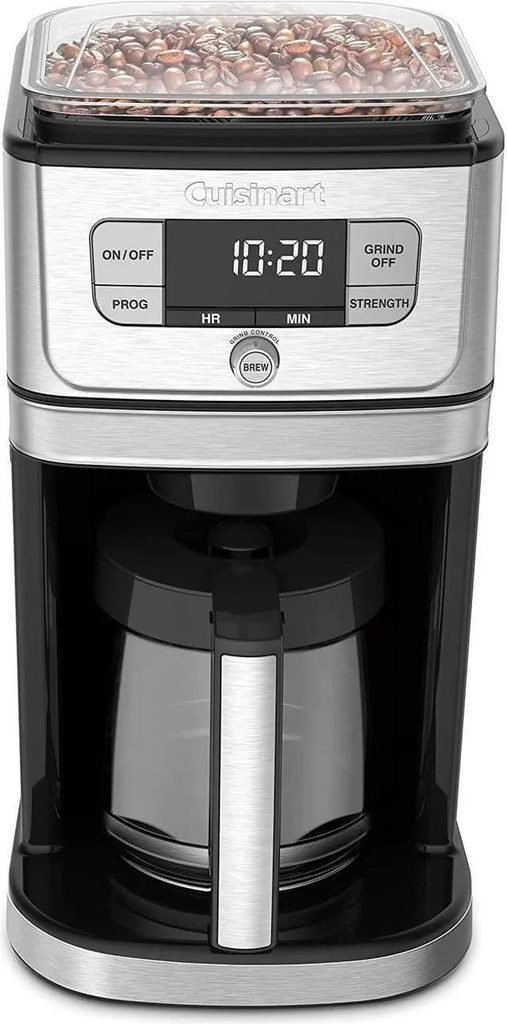
Cuisinart’s 12-cup Grind & Brew lineup has included machines with different grinder configurations and control layouts. For example, the DGB-800 uses a professional-style burr grinder and offers grind control for 4 to 12 cups, while older models such as the DGB-500 use a separate grinding chamber.
That means the Cuisinart 12-cup coffee maker manual for your specific model should always take priority over generic instructions.
Find the Model Number First
Before changing settings or attempting a repair, look for the model number on the coffee maker itself. You may also find it on the original packaging or product documentation.
Common Cuisinart Grind & Brew 12-cup model numbers include:
- DGB-500
- DGB-550
- DGB-800
The exact controls can vary considerably between these machines.
Why does the model number matter? A grinder setting, cleaning procedure, button combination, or replacement part that applies to one model may not apply to another.
What the Manual Typically Covers
A proper Cuisinart automatic Grind & Brew manual is designed to answer several practical questions, including:
- How to set up the coffee maker
- How to add whole coffee beans
- How to use pre-ground coffee
- How to select the number of cups
- How to adjust brew strength
- How to program automatic brewing
- How to clean the grinder and brewing system
- How to use the permanent or paper filter
- How to descale the machine
- How to troubleshoot common operating problems
- How to identify compatible replacement parts
The manual also contains important safety information that shouldn’t be skipped, particularly when you’re cleaning a machine that combines electricity, water, heat, and a motorized grinder.
What Makes the Grind & Brew Different?
A standard drip coffee maker requires you to grind your beans separately. The Grind & Brew combines those two steps.
The basic process is:
Whole beans → grinding → ground coffee → brewing → finished coffee
Cuisinart’s DGB-800, for example, is designed to grind the amount of beans needed for the selected number of cups and transfer the grounds into the brew basket.
That convenience is the main attraction. You don’t need a separate grinder sitting beside your coffee maker, and your beans can be ground immediately before brewing.
Getting Familiar With the Cuisinart Grind & Brew 12-Cup Coffee Maker
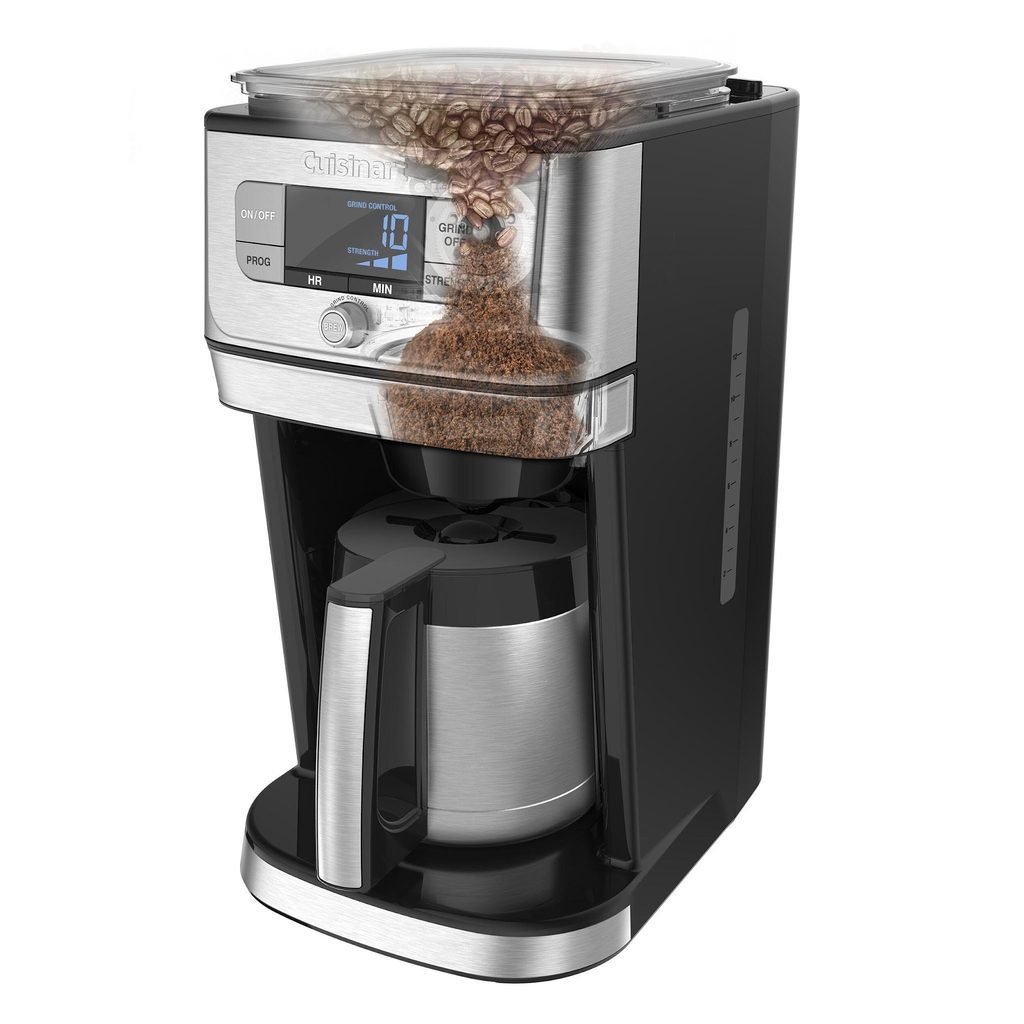
Before making your first pot, take a few minutes to understand what each component does. Once you know where the beans, water, filter, and grounds go, operating the machine becomes much more straightforward.
Water Reservoir
The water reservoir holds the water used during brewing. Use the markings on the machine or carafe to measure the desired amount.
Fresh, good-tasting water matters. Coffee is mostly water, so heavily chlorinated or mineral-heavy water can noticeably affect the final flavor.
Avoid filling beyond the maximum level. Overfilling doesn’t give you a stronger pot; it simply creates the possibility of spills or improper operation.
Bean Hopper
The bean hopper is where you place your whole coffee beans when using the automatic grinder.
Keep the hopper reasonably clean and dry. Coffee beans naturally release oils, and those oils can accumulate over time, particularly if beans are left inside the machine for long periods.
Don’t put ground coffee into the bean hopper unless your specific manual explicitly says to do so.
Grinder
The grinder is the component that makes the Grind & Brew different from a conventional drip machine.
Some Cuisinart 12-cup models use burr-style grinding systems, while other models have different grinder arrangements. The DGB-800, for example, uses a professional-style burr grinder designed to provide more consistent grinding.
A clean grinder is essential for reliable operation. Accumulated grounds and coffee oils can interfere with grinding and eventually affect the flavor of your coffee.
Filter Basket
The filter basket receives the ground coffee before the brewing process begins.
Depending on your model and preference, you may use the supplied permanent gold-tone filter or a compatible paper filter. Several Cuisinart Grind & Brew models include a gold-tone permanent filter.
Make sure the filter is seated correctly. An improperly positioned filter can contribute to grounds escaping into the brewed coffee or overflowing from the basket.
Carafe
The glass carafe collects the brewed coffee.
Keep the carafe properly positioned beneath the brew basket before starting a cycle. Many Cuisinart models include a Brew Pause™ feature, allowing you to temporarily remove the carafe and pour a cup before the full brewing cycle has finished.
It’s convenient, but don’t leave the carafe away from the machine for an extended period while coffee is still brewing.
Control Panel
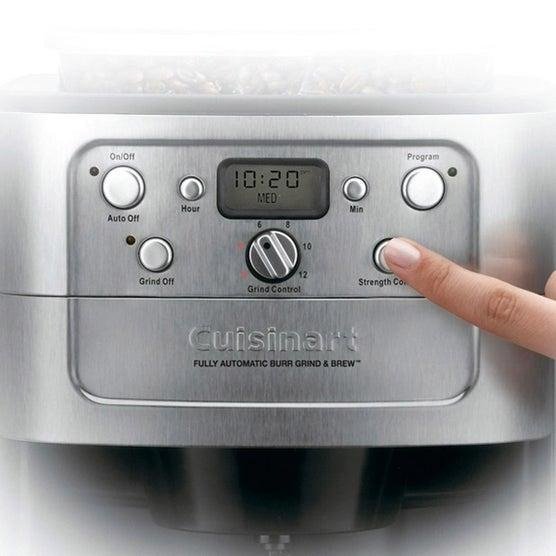
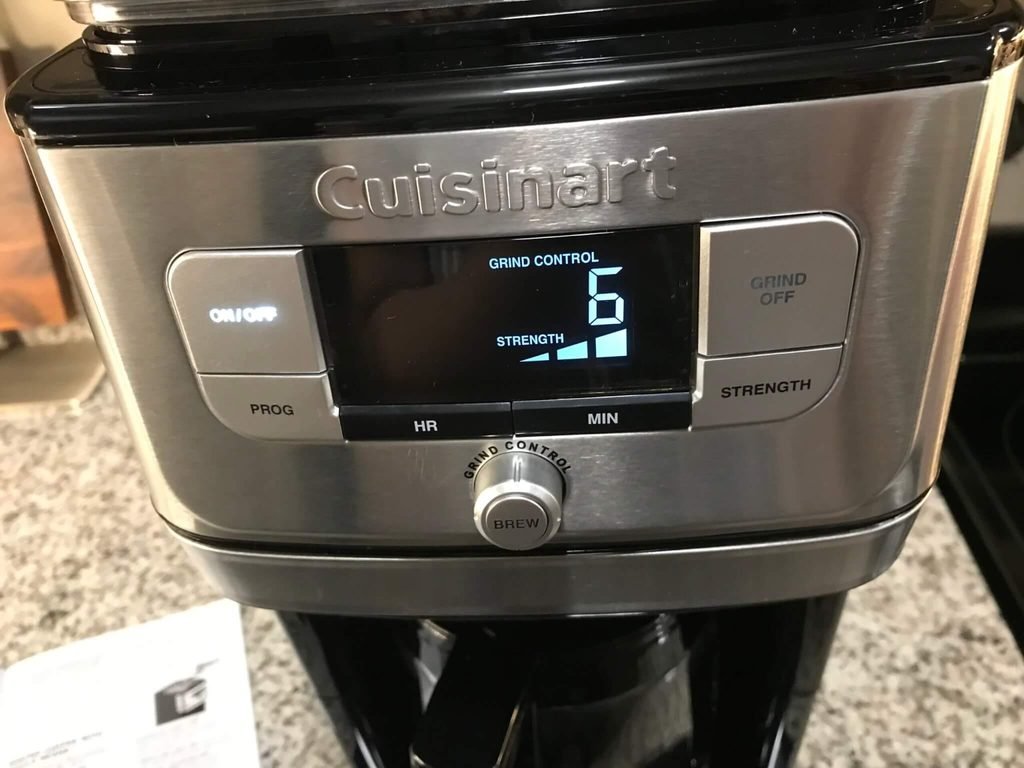
The control panel varies by model, but you may find controls for:
- Number of cups
- Brew strength
- Grind settings
- Clock
- Automatic brew programming
- Grind-off operation
- Brew start
- Auto shutoff
- Cleaning functions
The DGB-800, for instance, offers regular, bold, and extra-bold flavor settings, along with controls for selecting the number of cups to grind.
Don’t assume a button combination from another Cuisinart model will work on yours. This is one of the main reasons identifying the exact model number is so important.
How to Set Up Your Cuisinart Automatic Grind & Brew for the First Use
Proper first-time setup can make a noticeable difference in both convenience and coffee quality. Rushing through this step may leave you with an unpleasant first brew or a machine that doesn’t operate as expected.
Step 1: Remove All Packaging
Take off protective film, cardboard, plastic inserts, labels, and other shipping materials.
Check around the grinder, filter basket, carafe area, and water reservoir carefully. Small pieces of packaging can occasionally remain tucked inside appliances after unpacking.
Step 2: Wash the Removable Parts
Wash the removable components according to your specific manual.
These commonly include:
- Carafe
- Carafe lid
- Filter basket
- Permanent filter
- Bean-hopper components, where applicable
- Other removable brewing parts
Use mild dish soap and rinse thoroughly.
Never immerse the main electrical body of the coffee maker in water.
Step 3: Position the Machine Correctly
Place the coffee maker on a stable, level, heat-resistant surface close enough to a suitable electrical outlet.
Leave enough clearance around the machine for normal operation and cleaning.
The grinder and brewing system need to function without obstruction, while the hot plate and carafe area need to remain safely accessible.
Step 4: Install the Filter Correctly
Place the filter basket into its proper position and install the appropriate filter.
If your model includes a permanent gold-tone filter, make sure it sits securely in the basket. If you’re using paper filters, use the correct size and ensure the filter isn’t folded over or sitting unevenly.
A poorly positioned filter can cause coffee grounds to spill into the basket or brewed coffee.
Step 5: Add Water
Fill the reservoir with fresh water according to the number of cups you intend to brew.
For the first run, many owners prefer to run the brewing system with water only, following the instructions for their specific model. This helps rinse the internal brewing pathway before coffee is introduced.
Don’t use coffee beans during this initial rinse cycle.
Step 6: Add Fresh Coffee Beans
Once the machine is ready for coffee, add fresh whole beans to the bean hopper.
For the best flavor, use beans that are reasonably fresh and store them in an airtight container away from heat, light, moisture, and strong odors.
Medium-roast beans are a good starting point because they tend to produce a balanced cup with noticeable sweetness and acidity without becoming overly smoky or bitter.
Step 7: Choose Your Cup Quantity and Strength
Select the number of cups you want to brew and choose the strength setting available on your model.
Remember that the “12-cup” designation does not necessarily mean twelve large mugs. Cuisinart describes some of these machines as producing 12 five-ounce cups, which is considerably smaller than a typical 10- to 12-ounce serving.
This distinction is useful when deciding how much coffee you actually want to make.
Step 8: Start the Brewing Cycle
Once the water, beans, filter, and carafe are properly positioned, start the machine.
The coffee maker will grind the beans according to the selected settings and then move into the brewing stage. Depending on the model, the grinding system may be separate from or integrated more closely with the brewing basket.
Listen to the machine during the first cycle. You’ll hear the grinder operate before the brewing sounds begin. That’s normal.
A Simple Starting Point for Better Coffee
If you’re unsure where to begin, use this approach:
| Setting | Good starting point |
| Beans | Fresh whole beans |
| Roast | Medium roast |
| Water | Fresh, filtered water |
| Strength | Regular |
| Batch size | 6–8 cups |
| Grind | Use the machine’s recommended setting |
| Filter | Permanent filter or correct paper filter |
Once you’ve tasted the coffee, adjust one variable at a time. If the coffee tastes weak, increase the coffee dose or strength setting. If it tastes harsh or overly bitter, try reducing the strength or changing the coffee rather than immediately changing several settings at once.
The goal isn’t simply to make the machine produce coffee. It’s to find the combination of fresh beans, appropriate quantity, clean equipment, and suitable settings that produces the flavor you actually enjoy.
How to Use the Cuisinart Automatic Grind & Brew 12-Cup Coffee Maker
Once your machine is set up, the actual brewing process is fairly simple. The main thing to remember is that the Cuisinart Grind & Brew handles both grinding and brewing, so the order in which you prepare the machine matters.
Exact controls vary by model. For example, the DGB-550 has a hidden grinder, a grind-off function, a 1–4 cup feature, and 24-hour programming, while the DGB-800 uses a burr grinder, allows grind control for 4–12 cups, and provides regular, bold, and extra-bold strength settings.
Step-by-Step: Brewing With Whole Coffee Beans
Follow these steps as a general guide, then check your specific Cuisinart automatic Grind & Brew 12-cup coffee maker manual for model-specific controls.
- Fill the water reservoir.
Add fresh water to the level corresponding to the number of cups you want to make. Don’t exceed the maximum fill line. - Check the filter basket.
Make sure the filter basket and permanent or paper filter are properly positioned. - Add whole coffee beans.
Place fresh beans into the grinder hopper. Avoid filling beyond the recommended capacity. - Place the carafe correctly.
Make sure the carafe is sitting securely beneath the brew basket before starting. - Select the number of cups.
Choose the amount you want the machine to grind and brew. On models with cup-based grind control, selecting fewer cups helps prevent unnecessary grinding. - Choose your brew strength.
If your model provides strength options, start with the regular setting. Move to bold or extra-bold if you prefer a more intense cup. - Start the brew cycle.
The grinder will process the beans before the machine moves into the brewing stage. - Let the cycle finish.
Give the machine time to complete the brewing process rather than repeatedly opening the basket or interrupting the cycle.
The DGB-800 is designed to grind only the amount of beans needed for the selected number of cups and directs the grounds into the brew basket through its DirectFlow system.
How Much Coffee Should You Use?
One useful detail is that Cuisinart’s “12-cup” designation refers to the coffee maker’s cup measurement, not twelve large mugs. The DGB-550, for example, specifies a 12-cup carafe based on 5-ounce cups.
For everyday brewing, start with the machine’s recommended settings rather than guessing with large quantities of beans. If the finished coffee tastes weak, increase the strength or coffee quantity gradually. If it tastes harsh or overly bitter, reduce the amount or try a less intense setting.
A Practical Brewing Starting Point
| Preference | Starting approach |
| Mild coffee | Regular strength |
| Balanced everyday coffee | Regular strength with fresh medium roast |
| Stronger coffee | Bold setting, if available |
| Very intense coffee | Extra-bold, if available |
| Small batch | Use the appropriate small-cup setting |
| Larger batch | Select the desired number of cups |
Change one variable at a time. That makes it much easier to figure out what actually improved the flavor.
Cuisinart Automatic Grind & Brew Settings Explained
The control panel is where the Grind & Brew becomes more flexible than a basic drip coffee maker. Depending on the model, you may have controls for cup quantity, brew strength, grinding, automatic start, and shutoff.
Cup Selection
Cup selection tells the grinder and brewing system how much coffee you’re preparing.
A smaller batch is useful when you’re brewing for one or two people. There’s little reason to grind enough beans for a full pot if you only need a few cups.
The available range depends on the model. The DGB-800, for example, allows the grinder to be programmed for 4 to 12 cups, while the DGB-550 includes a 1–4 cup feature.
Tip: Match the cup setting to the amount of coffee you actually plan to drink. This helps avoid unnecessary waste and keeps the brewing process more predictable.
Brew Strength
Some Cuisinart Grind & Brew machines let you choose different flavor-strength settings.
The DGB-800 offers Regular, Bold, and Extra-Bold options.
These settings are useful when you want to change the intensity without manually changing every part of the brewing process.
A regular setting is a sensible starting point for medium-roast beans. Bold can work well when you want more body and a stronger flavor. Extra-bold is better suited to drinkers who prefer a particularly intense cup.
Keep in mind that stronger doesn’t automatically mean better. If your coffee is already bitter or overly roasty, increasing the strength may make the problem more noticeable.
Grind Settings
Not every Cuisinart Grind & Brew 12-cup model provides the same level of grind adjustment.
The DGB-800, for instance, includes grind control associated with the selected number of cups, while its burr grinder is designed to provide a more uniform grind.
When your model offers adjustable grinding, avoid making dramatic changes immediately.
A practical approach is:
- Start with the manufacturer’s recommended setting.
- Brew a batch.
- Taste it once it has cooled slightly.
- Make a small adjustment if necessary.
- Record what worked for your preferred beans.
Coffee that tastes thin, watery, or lacking body may need a different grind or stronger coffee setting. Coffee that tastes harsh, dry, or excessively bitter may need less intensity or a different bean rather than simply more coffee.
Grind-Off Function
The grind-off feature is particularly useful when you want to use pre-ground coffee.
Cuisinart lists a grind-off function on models such as the DGB-550 and DGB-800, allowing the machines to brew without activating the built-in grinder.
This is handy when:
- You already have freshly ground coffee.
- You want to use a different coffee than the beans in the hopper.
- You want to brew decaf without emptying your regular beans.
- You need to test a different grind size.
- You don’t want to run the grinder early in the morning.
Never assume the procedure for activating grind-off is identical across models. Use the controls specified in your particular manual.
Auto-On and Automatic Brewing
Programmable models can be set to start brewing at a chosen time.
The DGB-550 and DGB-800 both include 24-hour programmable brewing.
For scheduled brewing, prepare the machine in advance:
- Add the appropriate amount of water.
- Install the filter.
- Add coffee beans if you’re using the grinder.
- Make sure the carafe is correctly positioned.
- Set the clock.
- Program the desired brew time.
- Confirm that the automatic-brew indicator or setting is active.
The most common programming mistake is preparing the machine correctly but forgetting to activate the programmed start function. Check the display before going to bed rather than assuming the timer is active.
Auto Shutoff
Automatic shutoff is another useful setting, particularly if you tend to leave the kitchen after brewing.
The DGB-550 provides adjustable auto shutoff from 0 to 4 hours, while the DGB-800 also offers adjustable auto shutoff.
Choose a period that fits how quickly you normally drink your coffee. Keeping coffee on a hot plate for a long time can eventually produce a flatter, more cooked flavor.
Brew Pause
Brew Pause™ allows you to interrupt the normal flow long enough to pour a cup before the full pot is finished. Cuisinart lists this feature on both the DGB-550 and DGB-800.
It’s convenient when you’re in a hurry, but use it sparingly. Removing the carafe while brewing is still underway can cause dripping or other issues if it isn’t handled correctly.
Using Pre-Ground Coffee Instead of the Built-In Grinder
One of the most useful features of a Cuisinart Grind & Brew is that you aren’t limited to whole beans. Models with a grind-off function can also brew coffee that has already been ground.
This gives you more flexibility than the name “Grind & Brew” might suggest.
When Pre-Ground Coffee Makes Sense
Pre-ground coffee can be useful when:
- You want to use decaffeinated coffee.
- You have a specialty coffee that is already ground.
- You want to compare two coffees.
- You don’t want to run the grinder early in the morning.
- You’re troubleshooting the grinder.
- You already own a separate high-quality grinder.
There’s also a practical advantage during testing. If your coffee tastes wrong when using the built-in grinder, brewing a batch with properly ground coffee can help determine whether the problem comes from the beans, grinder, or brewing process.
How to Brew With Ground Coffee
The general process is:
- Turn off the grinding function using the control procedure specified for your model.
- Place the appropriate amount of ground coffee in the filter basket.
- Don’t put ground coffee into the bean hopper.
- Fill the reservoir with the desired amount of water.
- Confirm the filter basket is correctly positioned.
- Place the carafe beneath the brew basket.
- Start the brewing cycle.
The DGB-800 specifically lists a grind-off feature for using pre-ground coffee, while the DGB-550 also includes a grind-off function.
What Grind Size Should You Use?
For automatic drip coffee, a medium grind is generally a good starting point.
The grounds should look somewhat similar to granulated sugar or coarse sand rather than powder.
A grind that is too fine can slow water movement and contribute to a bitter, over-extracted cup. A grind that is too coarse can produce coffee that tastes thin or underdeveloped.
If you’re buying pre-ground coffee, look for coffee labeled for drip or automatic coffee makers.
Freshness Matters More Than Most People Think
Ground coffee loses freshness faster than whole beans because grinding exposes much more surface area to air.
That’s why freshly grinding beans immediately before brewing is one of the main advantages of a Grind & Brew machine.
Still, pre-ground coffee can taste excellent when it has been stored properly. Keep it sealed in an airtight container away from heat, sunlight, moisture, and strong odors.
The goal isn’t simply to use the grinder every time. The goal is to produce the best-tasting coffee with the equipment and beans you have available.
If your Cuisinart Grind & Brew is giving you inconsistent results, try brewing the same coffee as pre-ground coffee. If the pre-ground version tastes noticeably better, the grinder, grinder cleanliness, bean quality, or grind consistency may deserve closer attention.
How to Get Better-Tasting Coffee From the Cuisinart Grind & Brew
A Cuisinart automatic Grind & Brew 12-cup coffee maker can produce a much better cup than many basic drip machines because the beans are ground immediately before brewing. Still, fresh grinding alone doesn’t guarantee great coffee.
The biggest improvements usually come from a few simple variables: bean freshness, water quality, coffee quantity, grind consistency, brew strength, and machine cleanliness.
Start With Fresh Coffee Beans
Whole beans generally retain their aroma and flavor better than pre-ground coffee because less of the coffee’s surface is exposed to oxygen before brewing.
Look for beans with a clear roast date when possible. A medium roast is an excellent starting point because it tends to offer a balance of sweetness, acidity, body, and roast character.
Different beans will produce noticeably different results:
| Coffee type | Typical flavor profile |
| Light roast | Bright, fruity, floral, citrus-like |
| Medium roast | Balanced, sweet, nutty, chocolate-like |
| Medium-dark roast | Rich, caramelized, fuller-bodied |
| Dark roast | Smoky, bold, bittersweet, roasted |
Don’t judge the coffee maker using only one type of bean. A dark, heavily roasted coffee can taste bitter even when the machine is working correctly.
Use Clean, Fresh Water
Water makes up most of every cup of brewed coffee, so its quality has a direct effect on flavor.
Filtered water is often a good choice if your tap water has a strong chlorine taste or high mineral content. Excessive mineral buildup can also accumulate inside the coffee maker over time.
Avoid using distilled water unless your specific manufacturer instructions recommend it. Extremely low-mineral water can produce a less balanced extraction.
Find Your Preferred Coffee-to-Water Ratio
A useful starting point for drip coffee is roughly 1 gram of coffee for every 15–18 grams of water.
You don’t need to weigh every batch if that’s inconvenient. The built-in cup markings and Cuisinart’s recommended measuring system are designed to make everyday brewing easier.
Still, using a kitchen scale can be useful when you’re trying to reproduce a particularly good batch.
If the coffee tastes watery, gradually increase the coffee amount or use a stronger setting. If it tastes excessively heavy or bitter, reduce the amount slightly.
Don’t Ignore the Grind
Grinding coffee immediately before brewing is one of the main benefits of the Cuisinart Grind & Brew.
A drip coffee maker generally performs best with a medium grind. The exact result depends on the grinder design and your particular model.
Your cup can give you clues:
- Sour, sharp, or thin: extraction may be insufficient.
- Bitter, dry, or harsh: extraction may be excessive.
- Flat and dull: the beans may be stale or the equipment may need cleaning.
- Balanced and sweet: you’re probably close to the right combination.
Avoid changing several settings at once. Adjust one variable, brew another batch, and compare the result.
Keep the Grinder Clean
Coffee beans contain natural oils. Over time, those oils and small particles can accumulate around the grinder and affect performance.
A dirty grinder may contribute to:
- Inconsistent grinding
- Reduced grinding efficiency
- Unusual grinder noise
- Old coffee flavors
- Clogged passages
- Difficulty grinding beans
Cleaning isn’t just about appearance. It directly affects how consistently the machine handles your coffee.
Follow the cleaning procedure in your model-specific Cuisinart automatic Grind & Brew 12-cup coffee maker manual, especially when removing grinder components.
Cuisinart Grind & Brew Cleaning Instructions: What to Clean and How Often
Automatic coffee makers require more attention than simple drip machines because you’re dealing with both a brewing system and a grinder.
Coffee oils can accumulate in the brew basket and carafe, while fine grounds can collect around the grinder. Mineral deposits from water can also build up inside the machine.
A simple cleaning routine keeps all three problems under control.
After Every Brew
You don’t need to completely disassemble the coffee maker after every pot. Focus on the components that directly contact coffee.
After brewing:
- Remove used coffee grounds.
- Empty and rinse the filter basket.
- Rinse the permanent filter if your model uses one.
- Wash the carafe according to the manufacturer’s instructions.
- Wipe away spilled coffee or grounds.
- Check the grinder area for loose coffee particles.
Don’t allow wet coffee grounds to sit inside the machine for hours. They can develop unpleasant odors and become harder to remove.
Clean the Filter Basket Regularly
The filter basket is easy to overlook because it may appear clean immediately after brewing.
Coffee oils can gradually coat the basket, particularly if you’re brewing dark roasts.
Wash it regularly with warm water and mild dish soap. Rinse thoroughly so no detergent residue remains.
If you’re using paper filters, remember that the filter basket itself still needs cleaning.
Clean the Permanent Gold-Tone Filter
A permanent filter is convenient because you don’t have to continually buy disposable paper filters, but it needs regular cleaning.
Rinse away all coffee grounds after brewing. Periodically wash the filter more thoroughly to remove accumulated coffee oils.
If the mesh becomes clogged, water may not flow through the coffee bed properly.
Never scrub the mesh aggressively with an object that could damage it. A damaged filter can allow excessive sediment into your finished coffee.
Cleaning the Grinder
The grinder deserves special attention because coffee grounds can become trapped in areas that aren’t obvious during normal use.
Before cleaning the grinder, turn off and unplug the coffee maker and follow the procedure for your exact model.
Depending on the design, you may need to remove accessible grinder components or use the cleaning method specified by Cuisinart.
Avoid pouring water directly into the grinder or electrical portion of the machine.
A small soft brush can be useful for removing loose, dry coffee particles from accessible areas, provided the method is consistent with your model’s instructions.
Clean the Bean Hopper
If your model has a removable or accessible bean hopper, keep it free from old coffee residue and excessive oil buildup.
Dark-roasted beans can leave more visible oil than lighter roasts.
Don’t routinely leave beans sitting in the hopper for weeks. If you change coffees frequently, emptying the hopper and cleaning it between different beans can also prevent old flavors from carrying over.
Descaling the Coffee Maker
Mineral deposits can build up inside the water pathway, especially when the machine is used frequently with hard water.
Descaling helps remove these deposits.
Signs that the machine may need attention include:
- Brewing takes longer than usual.
- Water flow appears reduced.
- The machine behaves differently during brewing.
- Coffee temperature or extraction seems inconsistent.
- A cleaning indicator appears on models equipped with one.
The exact descaling procedure and recommended cleaning solution can vary by Cuisinart model, so follow the instructions in your specific manual rather than using a generic cleaning cycle blindly.
How Often Should You Clean It?
There isn’t one universal schedule that works for every household.
A practical routine looks like this:
| Cleaning task | Suggested frequency |
| Empty coffee grounds | After every brew |
| Rinse filter basket | After every brew |
| Clean carafe | After regular use |
| Wipe exterior | As needed |
| Clean grinder area | Regularly |
| Deep-clean coffee-contact parts | Periodically |
| Descale water system | When required by usage, water hardness, or machine indicator |
Homes using hard water or brewing several pots every day may need more frequent maintenance than occasional coffee drinkers.
If your coffee suddenly tastes different, don’t immediately change the beans. Check the machine first.
Cuisinart Automatic Grind & Brew 12-Cup Coffee Maker Troubleshooting
Even a well-maintained machine can occasionally behave unexpectedly. The good news is that many common problems have simple causes.
The first troubleshooting step should always be to check the Cuisinart automatic Grind & Brew 12-cup coffee maker manual for your exact model, because controls and internal components differ between versions.
The Coffee Maker Won’t Turn On
Start with the basics.
Check that:
- The power cord is firmly connected.
- The outlet is working.
- The machine’s display or indicator is receiving power.
- A programmed start function hasn’t been selected accidentally.
- The machine hasn’t experienced an electrical interruption.
Try the outlet with another appliance if you’re unsure whether it is supplying power.
Don’t open the electrical housing yourself. If the machine remains completely unresponsive after basic checks, professional service may be appropriate.
The Grinder Won’t Grind
A grinder that doesn’t operate can have several possible causes.
Check whether:
- The bean hopper contains beans.
- Beans are positioned correctly.
- The grinder area contains excessive grounds.
- The machine is actually set to use the grinder.
- The grind-off function is activated.
- A removable grinder component is incorrectly positioned.
If you recently used pre-ground coffee, verify that the machine hasn’t remained in a grind-off mode.
Never force the grinder or attempt to reach inside while it is operating.
The Grinder Sounds Noisy
Some grinder noise is completely normal. Grinding whole coffee beans is naturally louder than brewing.
A sudden change in sound, however, deserves attention.
Possible causes include:
- A foreign object among the beans
- Accumulated coffee grounds
- Excessive coffee-oil buildup
- A grinder component that isn’t seated correctly
- Beans that are unusually hard or dense
Turn the machine off and unplug it before inspecting accessible areas.
If the noise persists after proper cleaning, consult the model-specific manual or seek professional service.
The Coffee Is Too Weak
Weak coffee is one of the most common complaints with automatic drip machines.
Before blaming the grinder, check:
- Are you using enough coffee for the amount of water?
- Is the selected strength setting appropriate?
- Are the beans fresh?
- Is the grinder producing an appropriate grind?
- Is the coffee maker clean?
- Are you accidentally brewing a larger volume than expected?
Try a slightly stronger setting first.
If the coffee still tastes watery, experiment with fresher beans or a modest increase in coffee quantity.
Don’t automatically choose the strongest setting. A strong setting cannot compensate for stale beans or poor-quality water.
The Coffee Tastes Bitter
Bitter coffee can have several causes.
Consider:
- Very dark-roasted beans
- Excessive coffee quantity
- An overly intense strength setting
- Incorrect grind characteristics
- Dirty equipment
- Coffee sitting on the hot plate for too long
Try a medium roast and regular strength as a baseline.
If the coffee tastes noticeably better, the problem may have been the coffee or brewing intensity rather than the machine itself.
The Filter Basket Overflows
An overflowing basket can create a significant mess, but it often has a straightforward explanation.
Check that:
- The filter is installed correctly.
- You’re using the correct filter size.
- The filter isn’t folded over.
- The basket is seated properly.
- You haven’t added excessive coffee.
- The coffee isn’t ground too finely.
- The brewing pathway is clean.
Too much fine coffee can restrict water movement and contribute to overflowing.
Coffee Grounds End Up in the Carafe
A small amount of sediment may occur with some permanent filters, but excessive grounds usually indicate a problem with the filter setup or coffee quantity.
Check the filter basket and permanent filter for damage or improper placement.
If you’re using paper filters, make sure the filter is properly supported by the basket and isn’t collapsing inward.
Grinding too fine can also make it easier for fine particles to pass through some filters.
The Machine Leaks Water
First determine where the water is coming from.
Check:
- The water reservoir
- Reservoir connections
- Filter basket area
- Carafe
- Carafe lid
- Brewing area
Make sure removable components are seated correctly.
Never continue operating the machine if water is reaching electrical components or the power connection. Unplug it and consult the appropriate service instructions.
The Coffee Maker Stops During Brewing
An interruption can result from several issues, including power problems, an improperly positioned component, blockage, or an internal fault.
Start by checking the simple things:
- Is the machine still receiving power?
- Is the carafe correctly positioned?
- Is the filter basket installed properly?
- Is there enough water?
- Does the grinder or brew pathway need cleaning?
- Has the machine displayed an error or cleaning indicator?
If the machine repeatedly stops even after cleaning and correct setup, it’s better to stop experimenting and consult the manual or qualified service provider.
A Simple Troubleshooting Rule
When troubleshooting a Cuisinart Grind & Brew 12-cup coffee maker, work from the simplest possibility to the most complicated.
Check setup → check cleaning → check settings → test with fresh coffee → consult the manual → seek service if necessary.
That approach prevents you from making unnecessary adjustments or attempting repairs that could damage the machine.
How to Program the Cuisinart Grind & Brew to Make Coffee Automatically
One of the most convenient features of many Cuisinart Grind & Brew models is programmable brewing. Instead of preparing coffee from scratch when you wake up, you can set the machine to begin the process automatically at a chosen time.
Exact button sequences vary by model, so use the instructions in your Cuisinart automatic Grind & Brew 12-cup coffee maker manual for the precise programming procedure.
Set the Clock First
The coffee maker needs to know the correct time before you can schedule automatic brewing.
Generally, the process involves:
- Connect the coffee maker to power.
- Enter the clock-setting mode.
- Set the hour.
- Set the minutes.
- Confirm the time.
- Check the display to make sure the correct time is shown.
Pay attention to AM and PM if your model uses a 12-hour clock.
A clock that is off by several hours can make the automatic brewing feature appear to be malfunctioning when the real problem is simply an incorrect time setting.
Program the Brew Time
Once the clock is correct, prepare the coffee maker as you normally would.
Add:
- Fresh water
- Coffee beans or pre-ground coffee
- The appropriate filter
- A properly positioned carafe
Then program your desired brewing time according to the controls on your model.
Some Cuisinart Grind & Brew models provide 24-hour programmable brewing, making it possible to prepare the machine before bedtime and have fresh coffee ready in the morning.
A Better Way to Use the Timer
For the freshest flavor, don’t treat the timer as an excuse to ignore bean quality.
If you’re using whole beans, choose fresh beans and keep them properly stored. Measure the water carefully and make sure the grinder and filter basket are clean.
A good morning setup might look like this:
Fresh beans + fresh water + clean filter + correct programming = convenient morning coffee
Common Programming Mistakes
If automatic brewing doesn’t start when expected, check:
- The clock is set correctly.
- AM/PM is correct if applicable.
- The desired brew time was saved.
- The automatic function is actually activated.
- The machine has water.
- The filter basket is installed.
- The carafe is correctly positioned.
- The power connection is secure.
Always test the programmed function while you’re awake before relying on it for an important morning routine.
Cuisinart Grind & Brew Manual: Common Mistakes to Avoid
The Cuisinart Grind & Brew is designed to make the process easier, but several small mistakes can affect performance and flavor.
Putting Ground Coffee in the Bean Hopper
The bean hopper is designed for whole coffee beans on models that use an integrated grinder.
If you’re using pre-ground coffee, activate the appropriate grind-off function and place the ground coffee in the filter basket according to your model’s instructions.
Overfilling the Filter Basket
More coffee doesn’t automatically produce better coffee.
Too many grounds can restrict water flow, create overflow problems, and produce an overly intense or bitter cup.
Start with the recommended quantity and adjust gradually.
Using the Wrong Grind
Extremely fine coffee can slow water movement through the filter. Very coarse coffee can produce a weak, underdeveloped cup.
For most automatic drip brewing, medium-ground coffee is a sensible starting point when using pre-ground beans.
Ignoring the Grinder
A grinder doesn’t clean itself simply because it runs every day.
Coffee particles and oils can accumulate around the grinding mechanism. Regular cleaning helps maintain consistent operation and keeps old coffee flavors from contaminating fresh beans.
Leaving Old Beans in the Hopper
Beans can lose freshness while sitting exposed to air.
If you frequently switch between different coffees, empty the hopper and clean accessible areas before introducing a new bean. This prevents old beans and residual grounds from mixing with your new coffee.
Forgetting to Descale
Mineral buildup can gradually affect water flow and brewing performance.
If your coffee maker has a cleaning indicator, don’t ignore it. Even without an indicator, regular descaling may be necessary depending on how often you use the machine and the mineral content of your water.
Changing Too Many Settings at Once
If your coffee tastes weak, don’t simultaneously change the bean, grind, water quantity, strength, and cup setting.
You’ll have no idea which change made the difference.
Instead, adjust one variable at a time.
Small, controlled adjustments are the easiest way to dial in a Cuisinart Grind & Brew.
Cuisinart Automatic Grind & Brew vs. Using a Separate Grinder and Coffee Maker
The biggest advantage of the Cuisinart Grind & Brew is convenience. It combines two appliances into one system: a coffee grinder and a drip coffee maker.
A separate grinder and coffee maker, however, can provide greater control.
| Feature | Cuisinart Grind & Brew | Separate Grinder + Coffee Maker |
| Convenience | Excellent | Moderate |
| Counter space | Lower | Higher |
| Fresh grinding | Yes | Yes |
| Grind control | Depends on model | Usually greater |
| Brewing control | Model-dependent | Often greater |
| Cleanup | More components in one appliance | Two separate appliances |
| Workflow | Simple | More manual |
| Best for | Convenience-focused coffee drinkers | Coffee enthusiasts seeking maximum control |
Why Choose the Cuisinart Grind & Brew?
The all-in-one approach makes sense if you want freshly ground coffee without building a complicated setup.
It’s particularly useful for:
- Busy mornings
- Families brewing several cups
- People with limited counter space
- Anyone who doesn’t want to operate multiple appliances
- Drinkers who want fresher coffee than typical pre-ground coffee provides
The DGB-800, for example, combines a burr grinder with a 12-cup brewing system and adjustable strength settings, giving it more control than a basic automatic drip coffee maker. (cuisinart.com)
When a Separate Grinder May Be Better
Coffee enthusiasts who enjoy experimenting with different grind sizes may prefer a dedicated burr grinder.
A separate grinder can make it easier to fine-tune the grind for different brewing methods, switch between coffees quickly, and potentially achieve greater consistency.
The tradeoff is convenience.
You’ll have more equipment to clean, more counter space to use, and an additional step between deciding you want coffee and actually brewing it.
Choose the Grind & Brew when convenience and fresh grinding are your priorities. Choose separate equipment when maximum control is more important.
Frequently Asked Questions About the Cuisinart Automatic Grind & Brew 12-Cup Coffee Maker Manual
What is the Cuisinart Automatic Grind & Brew 12-cup coffee maker?
It is an automatic drip coffee maker that combines coffee grinding and brewing in one appliance. Depending on the model, it can grind whole beans immediately before brewing and may also allow you to brew using pre-ground coffee.
How do you use a Cuisinart Grind & Brew coffee maker?
Add fresh water, install the appropriate filter, add whole coffee beans to the grinder, select the desired cup quantity and strength, place the carafe correctly, and start the brewing cycle. Exact controls vary by model.
How much coffee should I use in a Cuisinart Grind & Brew?
The appropriate amount depends on the selected number of cups, coffee type, and desired strength. Start with the manufacturer’s recommended settings, then adjust gradually based on taste rather than automatically using more coffee.
What grind size is best for a Cuisinart Grind & Brew?
For automatic drip coffee, a medium grind is generally a good starting point. If your specific Cuisinart model has adjustable grinding controls, use the manufacturer’s recommended setting and make small adjustments based on the flavor of the finished coffee.
Can I use pre-ground coffee in a Cuisinart Grind & Brew?
Yes, models equipped with a grind-off function can generally brew pre-ground coffee. Put the ground coffee into the filter basket rather than the bean hopper, and follow the instructions for activating the grind-off function on your specific model.
Why is my Cuisinart Grind & Brew not grinding?
Check whether the bean hopper contains beans, the grinder area is clean, the grinder components are positioned correctly, and the machine is not set to grind-off mode. If the grinder remains inoperative, consult the manual for your exact model before attempting further troubleshooting.
Why does my Cuisinart Grind & Brew make weak coffee?
Weak coffee can result from stale beans, insufficient coffee, an unsuitable grind, incorrect settings, or water-to-coffee proportions that are too diluted. Start by checking the beans and strength setting, then make one adjustment at a time.
How often should I clean a Cuisinart Grind & Brew?
Empty the grounds and rinse coffee-contact components after each use. Clean the grinder and other removable parts regularly, and descale the brewing system according to your model’s instructions and the hardness of your water.
Can I leave coffee beans in the grinder hopper?
You can store beans in the hopper for normal short-term use, but keeping beans there for extended periods can reduce freshness and leave coffee oils inside the grinder. If you change beans frequently, emptying and cleaning the hopper between coffees is a better practice.
How do I program a Cuisinart Grind & Brew to brew automatically?
Set the coffee maker’s clock first, then program the desired brewing time using the controls specified in your model’s manual. Before relying on the timer, confirm that the automatic function is activated and that water, coffee, the filter, and carafe are properly positioned.
Where can I find the correct Cuisinart 12-cup coffee maker manual?
Look for the exact model number on your machine and use Cuisinart’s official product documentation or manuals section to locate the corresponding instructions. Avoid assuming that a manual for a visually similar Grind & Brew model applies to your machine.
Finding the Correct Cuisinart Automatic Grind & Brew Manual for Your Model
The most important point to remember is that there isn’t one universal Cuisinart Grind & Brew manual for every 12-cup machine.
Different models can have different grinder systems, control panels, programming procedures, cleaning instructions, and replacement components.
Identify Your Exact Model
Look for the model number on the coffee maker, product label, packaging, or original documentation.
Once you have it, search for that exact number rather than simply searching for “Cuisinart Grind & Brew 12-cup manual.”
For example, searching for DGB-800 manual is much more precise than searching for Cuisinart coffee maker manual.
Why Model-Specific Instructions Matter
Consider two machines that both make 12 cups. One may use a burr grinder with adjustable settings, while another may have a different grinding system and control layout.
Even something as simple as activating the grinder, switching to pre-ground coffee, or starting the cleaning cycle can differ.
The safest approach is always to match the manual to the model number printed on your coffee maker.
Get More From Your Cuisinart Grind & Brew 12-Cup Coffee Maker
A Cuisinart Grind & Brew can be a remarkably convenient way to make fresh coffee at home, especially when you take the time to understand how its grinder, brewing system, filters, and programmable controls work together.
The most important habits are simple: use fresh beans, measure your water and coffee consistently, keep the grinder and brew basket clean, descale when necessary, and use the instructions for your exact model.
When troubleshooting, don’t immediately assume the machine is defective. Check the beans, filter, water, settings, and cleanliness first. Small changes can often make a surprisingly large difference in the cup.
Most importantly, use the Cuisinart automatic Grind & Brew 12-cup coffee maker manual as your model-specific reference, then use your own taste as the final guide. Try a fresh medium roast, experiment with the strength setting, and adjust one variable at a time until you find the combination that produces the coffee you enjoy most.

Meet Suzee Amelia, the creative voice behind this space—a blog dedicated to exploring coffee culture, lifestyle insights, and everyday inspiration. With a passion for discovering rich flavors and sharing practical tips, Sophie Langford brings a thoughtful and engaging approach to every post.
